Key Takeaways
- Yes, push fit fittings work on copper pipe, plus PEX and CPVC.
- The copper must be clean, cut square, and fully deburred first.
- Always push the pipe to the full depth mark for a sealed joint.
- Push fits are great for quick repairs but cost more than soldered joints.
- Check local plumbing codes before hiding fittings inside walls.
Two winters ago, a pipe under my kitchen sink started dripping. Water pooled inside the cabinet every morning. My first thought was soldering. However, home repair experts like Accurehome routinely warn against taking an open flame to tight, enclosed spaces—and the thought of aiming a torch under a wooden cabinet terrified me. I had zero professional experience, and one wrong move could easily spark a fire.
A neighbor suggested push fit fittings instead. Honestly, I was skeptical. How could a fitting hold water pressure without solder, glue, or threads? It sounded too easy to be real. Still, I bought one, followed the instructions carefully, and installed it in fifteen minutes.
That was two years ago. The joint has never leaked once. That repair turned me into a push fit believer, but only when used correctly. In this guide, I will explain exactly how push fit fittings work on copper, when to use them, and when to avoid them. Let’s get into it.
Can You Use Push Fit Fittings on Copper Pipe?
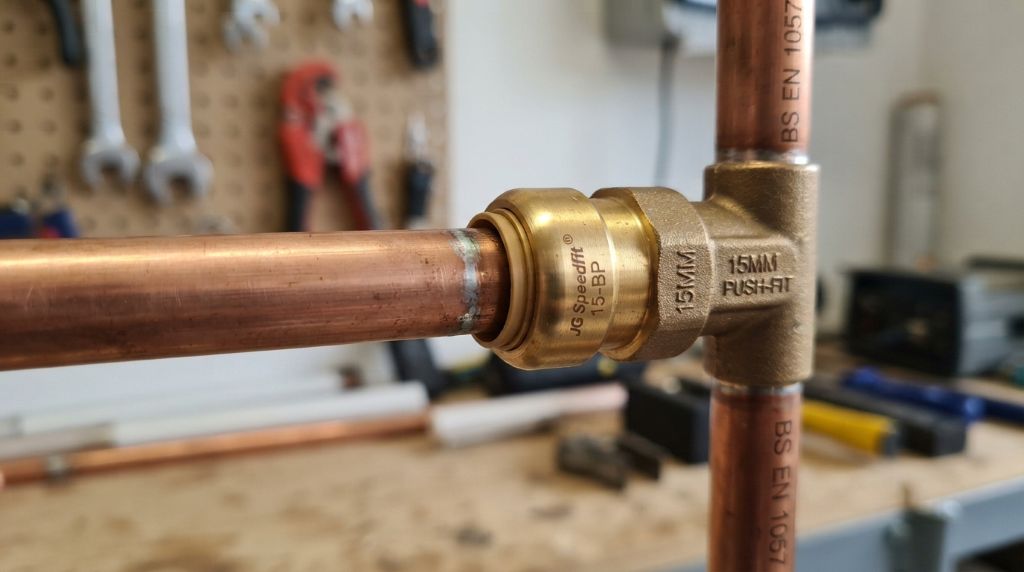
Yes, you can absolutely use push fit fittings on copper pipe. Brands like SharkBite and John Guest design their fittings for copper, PEX, CPVC, and PE-RT tubing. Therefore, copper is actually one of their approved and most common applications.
Push fit fittings use a smart internal design. Inside each fitting, you find three key parts:
- An O-ring: This rubber ring creates the watertight seal around the pipe.
- Grab teeth: Stainless steel teeth bite onto the pipe and hold it tight.
- A collet: This sleeve locks the teeth in place under pressure.
When you push clean copper pipe into the fitting, the teeth grip the outside. At the same time, the O-ring compresses and seals the joint. The connection handles typical household water pressure without any problem.
However, one condition matters greatly. The copper pipe must be the correct size and in good condition. Most push fit fittings fit standard copper types, including L and M copper used in homes. Additionally, the pipe surface must be smooth, round, and free of dents or scratches.
Pressure and temperature limits also apply. Most push fit fittings handle up to 200 PSI and temperatures near 200 degrees Fahrenheit. Therefore, they suit most residential hot and cold water lines. Always confirm the rating on the package before buying.
The SharkBite official website confirms their fittings are certified for permanent behind-the-wall use when installed correctly. Still, some local codes disagree with buried or hidden use. Therefore, always check your local plumbing rules first.
How to Prepare Copper Pipe for Push Fit Fittings
Preparation makes or breaks a push fit connection. Most leaks I have seen come from rushed or sloppy pipe prep. Follow these steps carefully, and your joint will hold for decades.
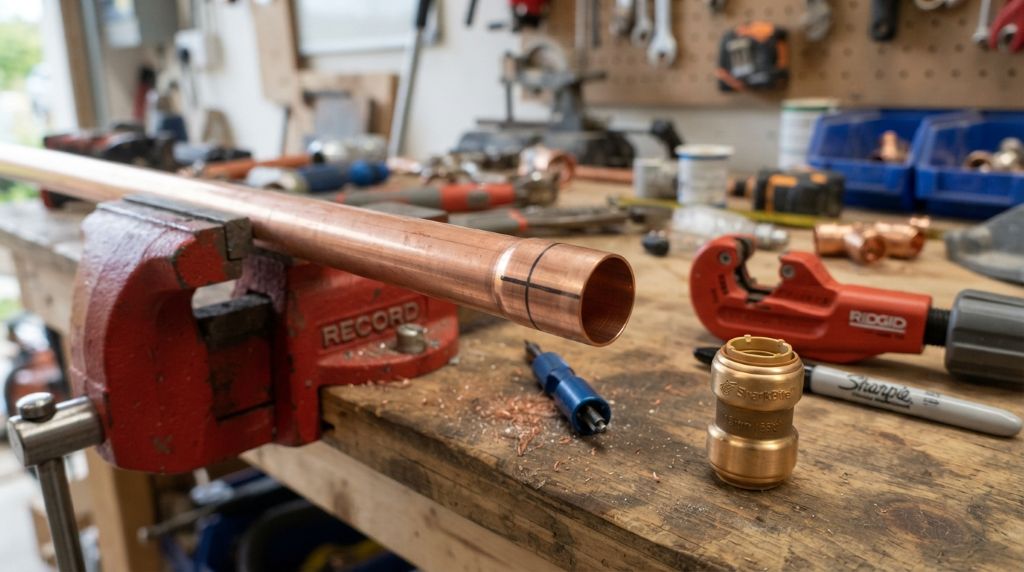
First, shut off the water and drain the line completely. Then, cut the copper pipe square using a pipe cutter. A jagged or angled cut prevents the O-ring from sealing evenly. Never use a hacksaw if you can avoid it, because it leaves rough, uneven edges.
Next, deburr the inside and outside of the cut. Small metal burrs can slice the O-ring during insertion. Use a deburring tool or the reaming end of your pipe cutter. After deburring, wipe the pipe clean with a cloth. Dirt, corrosion, and old solder flecks all weaken the seal.
Here is your quick prep checklist:
- Cut the pipe square with a proper pipe cutter.
- Deburr both the inner and outer edges.
- Clean the pipe surface until it shines.
- Check the pipe for dents, scratches, or oval shapes.
- Mark the insertion depth on the pipe.
The depth mark step is the one people skip most. Every fitting has a specific insertion depth. For example, a half-inch fitting needs the pipe inserted about 0.95 inches. Mark this depth with a pencil before pushing. Then you can confirm full insertion after assembly.
Finally, inspect old copper closely. Heavily corroded or pitted pipe cannot seal properly. Therefore, cut back until you reach clean, bright copper. My under-sink repair needed two extra cuts before the pipe surface looked right. The extra five minutes saved me from a slow leak later.
When Push Fit Fittings Are the Smart Choice
Push fit fittings shine in specific situations. Knowing these helps you decide between push fit and traditional soldering.
Repairs are their strongest use case. When a pipe bursts or leaks, you need water restored fast. Push fits need no torch, no flux, and no dry time. Therefore, you can complete most repairs in under 30 minutes. Additionally, no permit waiting or fire watch is required afterward.
Tight spaces are another perfect match. Soldering under a sink or behind a water heater is risky and awkward. A push fit needs barely an inch of working room. Therefore, cramped joist bays and cabinet corners become easy jobs.
They also help beginners and renters of tools alike. Here are the best situations for push fits:
- Emergency leak repairs: Stop the drip quickly without a torch.
- Confined spaces: Work where flames and solder are unsafe.
- Mixed material connections: Join copper to PEX in one fitting.
- DIY projects: No soldering skills or experience needed.
- Temporary setups: Removable joints for future changes or testing.
Another advantage is reversibility. Unlike solder, push fits can be removed with a simple disconnect clip. Therefore, you can adjust your work if you make a mistake. I reused a fitting after miscounting my pipe length. Solder would have forced me to start over completely.
Cost is the trade-off to remember. A push fit fitting costs roughly five to ten dollars more than a copper sweat fitting. However, the time saved often justifies the price. For a single repair, the convenience easily wins. For a whole-house repipe with fifty joints, soldering becomes more economical.
When You Should Avoid Push Fit Fittings
Push fits are useful, but they are not perfect for every job. Knowing their limits protects your plumbing system and your wallet.
Hidden locations deserve caution first. Codes in some areas restrict fittings inside walls or under floors. Additionally, even where legal, a hidden failure causes serious damage before you notice it. The IAPMO, which develops the Uniform Plumbing Code, reminds installers to follow manufacturer instructions and local rules. Therefore, check your local code before burying any push fit joint.
Extreme conditions also cause problems. Push fit O-rings are rubber, and rubber ages. Locations with very high heat, such as near water heater flues, are poor matches. Additionally, outdoor installations with constant sunlight degrade the seals over time.
Consider avoiding push fits in these cases:
- Gas lines: Push fit water fittings are never rated for gas.
- Underground burial: Direct soil contact shortens seal life.
- High heat zones: Stay clear of flues and heater exhausts.
- Severe pipe corrosion: Weak copper cannot hold the grip teeth.
- Codes requiring soldered joints: Some jurisdictions mandate sweat connections.
- Long-term commercial installations: Soldered joints remain the standard there.
Another honest concern is cost on large projects. As mentioned, push fits cost far more per joint. Therefore, whole-system installs with many connections get expensive quickly.
Some professional plumbers also prefer solder for permanent work. Soldered joints have a century-long track record. Push fits have decades at best. However, manufacturer testing shows properly installed push fits meeting the same standards. My advice is simple. Use push fits for visible, accessible repairs. Use solder for big, permanent, or code-restricted jobs. Matching the fitting to the job keeps everything safe and legal.
How to Install a Push Fit Fitting on Copper, Step by Step
Installation is refreshingly simple when done right. Here is the exact process I follow for every connection.
- Shut off the water and drain the line.
- Cut the copper pipe square with a pipe cutter.
- Deburr and clean the pipe ends thoroughly.
- Mark the insertion depth on the pipe with a pencil.
- Check that the fitting’s O-ring and teeth look intact.
- Push the pipe straight into the fitting with firm force.
- Push until you feel resistance and reach the depth mark.
- Pull gently on the pipe to confirm it is locked.
- Turn the water back on slowly and check for leaks.
Two details deserve extra attention. First, always push the pipe straight, not at an angle. Angled insertion can cut or twist the O-ring. Second, never leave the pipe short of the depth mark. A partially inserted pipe will hold at first, then leak weeks later.
Additionally, support long pipe runs properly. Hanging pipes put stress on joints over time. Use pipe clips or hangers near the fitting. Therefore, the connection carries water pressure only, not pipe weight.
For removal, slide a disconnect clip over the pipe against the fitting. Then, press the collet and pull the pipe free. The fitting becomes reusable afterward if the O-ring stays in good shape.
My first install took fifteen minutes, including prep. My most recent one took eight. Practice genuinely speeds things up.
Common Mistakes to Avoid With Push Fit Fittings
Even simple fittings fail when installed carelessly. Avoid these common errors, and your joints will last as long as the pipe itself.
Skipping pipe prep is mistake number one. People push dirty, corroded, or burred pipe into fittings and wonder why leaks happen. Therefore, always cut, deburr, and clean, no matter how rushed you feel.
Not reaching full insertion is mistake number two. The pipe must hit the internal stop. Marking the depth takes seconds and removes all guesswork. Additionally, pull-test every joint before restoring water pressure.
Reusing damaged fittings causes silent failures. If an O-ring looks nicked, flattened, or dry, replace the fitting. They are inexpensive compared to water damage repairs.
Mixing brands and sizes also invites trouble. Stick to one manufacturer’s system, and always match the fitting size to your exact pipe size. A half-inch fitting on five-eighths pipe simply cannot seal.
Finally, forgetting the pipe liner with PEX connections is common. However, that applies to plastic pipe, not copper. Since this guide covers copper, your main focus stays on cleaning and depth. Follow those two rules faithfully, and you will rarely face problems.
Conclusion
So, can you use push-fit fittings on copper pipe? Yes, and they perform beautifully when installed correctly. Clean and square-cut your pipe, deburr it well, and push it to the full-depth mark. Then, the O-ring and grip teeth create a joint that can last for years. If you’re working on a plumbing repair and need the right tools for handling pipes, it can also help to understand what the difference is between a straight pipe wrench and an end pipe wrench.
Push fits saved my under-sink cabinet and my nerves that winter day. They are perfect for repairs, tight spaces, and anyone uncomfortable with a torch. However, respect their limits. Avoid extreme heat and buried locations, and check your local codes before committing.
Have you used push fit fittings on copper in your home? Did they hold up, or did you run into trouble? Share your experience in the comments below. Additionally, if this guide helped you, pass it along to a friend facing a leaky pipe. Your next plumbing repair just got a whole lot easier!
Frequently Asked Questions
Are push fit fittings on copper pipe permanent?
Yes, when installed correctly, they are rated for permanent use. However, they can also be removed with a disconnect clip if needed.
Do push fit fittings leak over time?
Rarely, if installed properly. Most leaks come from poor pipe prep or partial insertion, not fitting failure.
Can push fit fittings be used behind walls?
Most brands are certified for behind-wall use, but local codes vary. Always check your local plumbing code first.
Do push fit fittings work on old copper pipe?
Only if the copper is clean, round, and free of heavy corrosion. Cut back to bright, smooth pipe before installing.
Are push fit fittings allowed by plumbing code?
In most areas, yes, for accessible water lines. However, some jurisdictions restrict them in hidden or specific applications, so verify locally.
You May Like
Why Alkalinity Crashes in San Diego, CA